Hello and welcome to my first tutorial. Bear with me. I was playing around with the Tim Holtz tattered leaves and happened to come up with something that looks similar to a real leaf. Now someone else could have done this all ready but I have not seen it and if it is all ready out there I am sorry. SO this is what you will end up with when we are done.
Ok here are the supplies you will need.
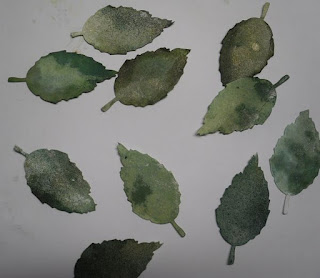
I am sure any leaf die or hand cut leaves will work. I started out with just plain white card stock and cut out some leaves. I used different shades of greens from Glimmer mists and distress stains. SO first spray leaves with water and then the mists. Then if there are empty spaces use the stains to fill in.
While they are still wet I used the Forest Moss stain to darken the edges to give some depth as you see in the picture below.
After you stain the edges spray with water to where they are sopping wet. If you need to move them I use a small spatula to scoop them up. Then put inked side down and start pinching the vein that runs up the leaf being careful not to rip them.
Now you can curve it a little to make it more realistic.
Form it to your satisfaction.
Then start forming the little veins that reach out to the end of the leaf. This takes a little practice and care but the end result is worth it. Do this on both sides and sometimes the long vein wants to undo itself but just keep working it.
When all is done you will have something that looks like this.
Now let it dry completely then turn it over and you will have a leaf!!!


Lisa,
ReplyDeleteThis is brilliant, have to try this one, love the idea.
These are awesome!! They look so real!! Love it!!
ReplyDeleteLisa, these are beautiful and the scrap page is too! Great job!
ReplyDeleteLisa, these are the best leaves I've ever seen! So realistic and worth the effort. Thanks for showing us how to do it!
ReplyDeleteLet me tell you that I am totally impressed!!! There is no advise I can give you because this is total perfection!!! The leaves are beautiful!!! Great work Lisa!! I love it!!
ReplyDeleteWow Lisa, these leaves are fantastic!!! I love them, and your tutorial is perfect!! Definitely giving these a try!! :)
ReplyDeleteOh wow! Those leaves are amazing! Thanks for sharing the technique!
ReplyDeleteLisa, these are wonderful! Great tutorial!
ReplyDeleteBeautiful leaves, they are so realistic! great tutorial.
ReplyDeleteIt's Great idea! Thanks for sharing!
ReplyDeleteLisa thanks for sharing the leaves tutorial, great tut!!!!
ReplyDeleteHugs,
Bobbie
Lisa, these are FABULOUS! Thanks so much for the tute!
ReplyDeleteWhat a fabulous tutorial, love your leaves!!!
ReplyDeleteLisa a great job on the tutorial and VERY realistic looking leaves.
ReplyDeleteI'm currently putting together a costume and trying to make as many thing as I can rather than spending even more money :P And this tutorial is absolutely fantastic for some of the decoration I need, thanks so much! I'm going to improvise (eek) with water colours and other paints, hopefully to a similar effect.
ReplyDelete