Showing posts with label Tutorial. Show all posts

Saturday, March 9, 2013

PaperHaus DT tutorial!!!

Hello, I am sharing a simple tag tutorial for you today. You can use any tag die or even hand cut one. I also used a flower die and again any flower die will do also, I did hand cut the leaves in different sizes. I used the Sizzix-frame back, ornate #3. I love this die!!!!
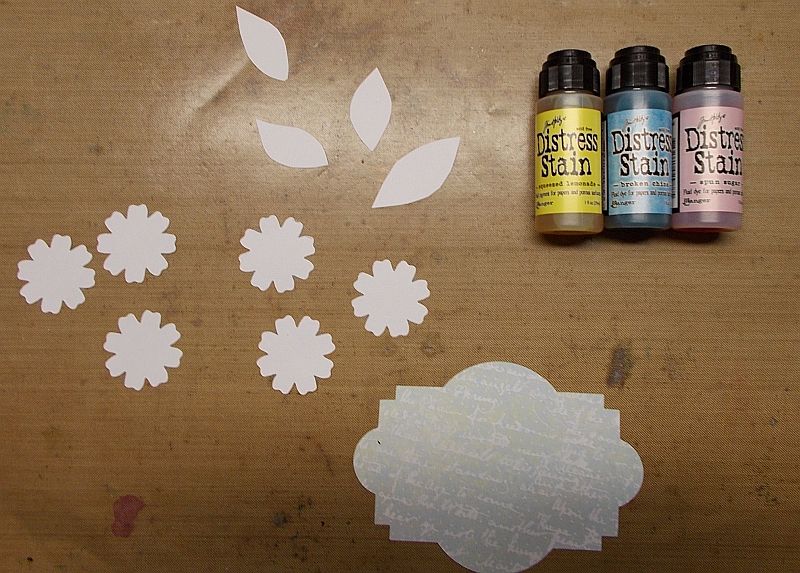
So punch out your die and flower shapes. I used the Kaiserkraft "Pink Gelato" collection for the tag shape and white card stock for the flowers and leaves. These are the color stains I wanted to use.
 Then spray your flowers and leaves so the stain blends better and always start with the lightest color first.
 Here you can see I used the Spun Sugar first.
 Hen I added The Lemonade stain and after that I added the Broken China. I used Peeled Paint for the leaves. Then while the flowers are damp I like to scrunch them up and shape the leaves some. Let them dry either by themselves or a heat gun.
 Then after they are dry I like to unravel them and if they need it shape the petals a little. I also like to draw  the veins on the  leaves.
 So when you are assembling the flowers always off set the petals. This makes the flower look more realistic. I used a small sun punch for the center and the added a pearl to the center of that. Then glue on the tag and you are done. If you use light paper you can journal over the top or you can add this to a card!!!
 Here is the finished tag. So many possibilities!!! Have a great weekend and thank you for visiting!!!


Saturday, February 9, 2013

A Simple Tutorial-- Resist Technique--PaperHaus Magazine DT


Hello!!! Hope you all have a good crafty week. This is a tutorial for my DT at PaperHaus Magazine . There is so much inspiration at PaperHaus Magazine!!!
I am here to share with you a simple tutorial that you can get so many results with. This is my version on a resist technique.
Here are the supplies you will need:
Inks of you choice.
Stamp of choice
Embossing ink, clear or white
Heat gun,
Blending tool and of coarse a tag.
 First use the embossing ink pad on your stamp.
 Then stamp on your tag where you prefer. I always try and get 2 sides of the tag stamped. One using a good portion of the stamp and the next one maybe use half or a quarter of the stamp.
 Then cover stamped area with the embossing powder, shake excess off.
 Then Using the heat tool set the powder. It should look like this when you are done.
 Then decide which colors of ink you would like to use and use your blending tool. The neat thing about this is you can customize your colors to match your project also. Use the tag for a layer or use this technique to create your own layers. The possibilities!!!! Here is what I came up with.
 Thank you so much for stopping by. I hope you have enjoyed this!!! Have a wonderful weekend!!!

Saturday, January 5, 2013

PaerHaus Dt project

Hello all!! Here to share with you an Off the Page Project tutorial with you. These are so fun to do and if you haven't tried one now is the time to try!! I created this for PaperHaus Magazine .
Here is a photo of the finished project. I made the flower at the top right and tucked a Prima wooden clock behind it. Also used a Vintage trinket. The bottom left flower is a Prima along with some other flowers from my stash.
 Here is another photo of it opened with different shaped pockets and the various tags!
 First decide on which project you would like to use. I used a Kasiercraft wooden book.
 Then choose which paper you would like to use. I used some Prima. Then measure and cut paper to fit. This happened to be an 8x8 project so it was very easy to cut the paper to fit. Be sure to cover both sides.
 Then adhere the paper using your favorite adhesive. Be careful to keep the paper in order in which it goes on. I used a pattern that I could cut down the middle and it would show up on both sides of the cover.
 Once you have adhered the paper distress the edges and if your distressing tool won't fit on the edges just use some old scissors.
Then of coarse ink if desired!!
 Now here is where it gets really fun...you can ink, mist, gesso, use gelatos or whatever you like to add some texture or color to your project. I happened to use some gesso, a stencil and paint for this one.

 Once you have your background to where you are happy it is time to add some pockets to fit tags and whatever you decide to put in them. I like to cut different shapes, like a "V" or use some designer scissors to make the top edge of the pocket. This one I chose a "V" shape.
 Then add some lace and pearls for the edge of the pocket. I decided to stencil a little flourish and I cut out the beautiful word, inked the edges and added some bling.
Make pockets on each side and the middle of the inside and then the fun part....making some tags for all the pockets.  Leave some spaces for little pictures and some spaces to journal on. It is easier than you think to make these and they are really a blast to make. Need some inspiration?? Go to the magazine and look around, you will find more than a ton there!!! I hope you enjoyed my tutorial and if you have any questions please just ask!!
Hope you are having a wonderful start to the new year!!!

Saturday, November 17, 2012

PaperHaus Magazine and Halo Handmade DT

Hi Peeps...hope all is well today. Lisa Duke here to share a tutorial on how I put a layout together. This was a challenge for me to make and I am glad to escape my box!! I made this for PaperHaus Magazine and Handmade Halo  Design Team.I am also playing along at Berry71Bleu with this layout!
#: First I picked out the photos I wanted to use and I have been wanting to scrap this photo of my dgd for awhile.
 Then I hunt through my paper stash and see which ones I like the best.
Then on this one I cut out the center to save on paper and maybe make a flower to match later.

 On this background I decided to try an image transfer. I have never done one before. So I picked out and image I wanted to use and got out my Gloss Gel Medium. I didn't want the whole page so I painted my medium just on the image, giving it a pretty good coat, then placing it face down on my background. Now let it dry completely.
 Spray image with water, I did a little more than misted it as you can see, let it soak for a minute, and dab the excess water of.
 Then with the utmost care start rubbing lightly with your finger. I can't stress enough to do this very slowly until your image appears. You can fine tune it but if you rub to hard the image will come off. Let the image dry.
 Here is how it turned out. For the rest of the background I used a zebra mask and gesso and some TA glimmer mist (Fully Purple).
 Then it was really bright and I wanted to tone it down so I gave the whole page a wash of watered down gesso.
 hen I still wasn't happy so I decided to add a little more texture with the paper you see in the photo. The I was finally done and ready to embellish!!!!
This is what I came up with. The resin flower in the middle of the film strip and the bird cage charm are from Handmade Halo, these are just 2 of the hundreds you can choose from!!!! Hope you enjoyed my tutorial...Have a fabulous weekend!!!
Thank you for visiting, I appreciate it very much. Have a wonderful rest of the weekend!


Sunday, September 9, 2012

Adding a little texture to our projects

Hello...I hope you are having a great weekend. I know there is texture tutorials out there but I thought I would share how I add mine sometimes. The supplies I used are gesso, paint brush and sheet rock net. I think that is what it's called. Here is a pic of what I used.
I first cut the "net" to a shape I liked then placed it on my project. This is really easy to do.
Then I started to add my gesso with the paint brush and be sure to leave the edges uneven.

So it looks like this.
Then you will slowly peel the net off.
And now you have some texture. You can use anything like this net stuff to get different results. The possibilities are endless!!
This is the layout I used this technique on...oh and after you peel the net off you can place it somewhere else on the paper and get the reverse effect. I did this in the top left hand corner. Thank you for stopping by!!
Have a wonderful week!!!


Wednesday, March 14, 2012

Shabby Butterfly tutorial

SHABBY BUTTERFLY TUTORIAL
Supplies needed
2 large butterflies
2 med. butterflies
Strong glue
Antenna wire
Gesso
Acrylic paint of choice
Scissors
Lace
Stickles
Gems for body
First lightly distress edges of butterflies and then lightly ink the edges.
Fold up the butterflies. I like to make the creases go the same way as the vein would. I fold the butterfly in half first (so wing to wing are together) then angle the folds,
so they come out looking like this.
Now using a thin strip of glue down the body line, adhere the medium butterfly to the large one taking care as to not spreading the glue under the wings. I use my fingernail, or tooth pick and run it down the body line. Let the glue set.
Get some gesso and paint and dab the paint into the gesso to lighten it up a bit and then dab on the butterfly wings. I also dabbed on the smaller wings a little. I could of done this step before I glued them together but I didn't so hey this works to!! Set aside to dry for a bit.
To make the antennas, you can use various items for instance the stem off one of your paper flowers. In this case I used white floral wire. Cut about 4 inches, fold in half and turn down the ends. You can use anything for this. I used my needle nosed pliers. I like them to look different and not all the same to give the butterfly some personality. (did I just type that!!)
For the lace I use ruffled lace. It makes the wings pop up a bit. Cut a 2 inch length and cut to shape the wings. This does not have to be perfect as you can see! Do not cut the seam off, cut away from the seam.
Use a strong glue for this next step. Hold the smaller wing up and put up and put a line of glue right next to the body line and place your winged shaped lace on top of the glue. 
Try not to push the lace towards the body and squish the glue towards there, you don't want the wing to stick to it. Same procedure on the other side.
To attach antenna cut a scrap piece of paper keeping it small enough to "hide" behind the butterfly and put a blob of strong glue on it. Place the antenna on top of the glue.
Then place the butterfly on top of that squeezing the glue around to get a good hold. Let set for a minute or two.
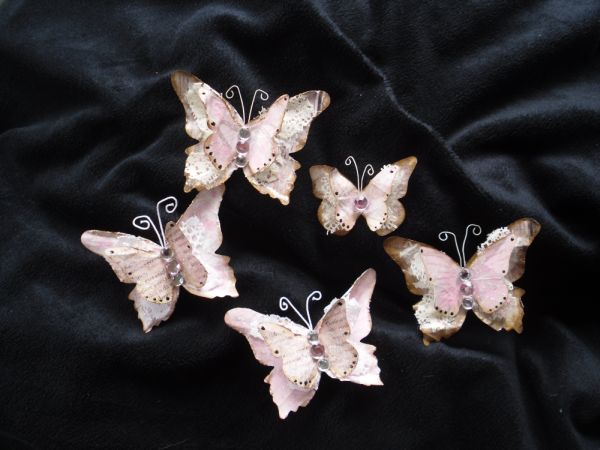
The adhere the gems to make the body, or whatever you choose to use for that. Then I add glitter and walla you have a butterfly. You can do this in all kinds of sizes.

Hope you like this tutorial. This is my second one so I am still very new to this. Have fun!!!!

 Wow do people still do blogs!!! I guess so since I am here...still kinda old school I guess. Thought I would update. Even though I don'...