Wednesday, September 4, 2013

I am Semi back!!!

Hello and it seems like forever since I have posted anything on here. I think I have finally gotten in the groove of working (no overtime) 40 hours a week!! I haven't had time for much scrapping and I miss it terribly. I made a blank layout with the line Little Miss from Bobunny. I do have this in my ETSY store for sale.
Here some close ups:
And yet another one!
I painted a Dusty Attic chipboard and added some liquid pearls to it. Well that is about it. Now with the Rim Fire at 85% contained life is returning to normal again. Still some smoke in the area but nothing like that first week. I take the time to thank all the fire related people who kept the fire at bay. Thank you....
Take care and hope to see ya all soon....Lisa


Friday, June 21, 2013

DT project for PaperHaus Magazine

Wow it has been awhile since I posted. I have been MIA because I took a full time job on and have been getting lots of overtime. It's been rough adjusting to it but I am really liking being back in the work force BUT I miss scrapping. I have only been doing a little here and there....anyway here is a project I made for PaperHaus magazine
  I used Websters Pages and some Fab Scraps paper.
I made the big flower using the Tim Holtz Tattered Floral die.I used some masks and gesso. Added lace and pearls.There is even some burlap!!! I hope you enjoyed this project.
This was my trip to Aussie last year to meet a wonderful friend.
 Hope you enjoy the weekend!!!

Thursday, April 25, 2013

PaperHaus Magazine DT Layout

Hello everyone!!!! I am here today to share with you a Layout I made for "Remember Me".  A DT Project for PaperHaus Magazine. If you haven't visited this magazine yet it is a must!!!
This photo was taken in Aug. of 2011 when my second Grand Daughter was born, hence the title Grammie x 2. What a special day for me. Grandkids are life's icing on the cake!!
For this layout I used the Kaisercraft "Pink Gelato Collection" . I LOVE the soft colors of this collection!
Here I used some gesso and paint with some coarse texture added in and I use a stamp for the back ground. I did use a Dog Wood punch for the flowers, mini sun punch for the centers. The fern like leaves are a sizzix die.
 These flowers are Prima and the I did change the color a little to match better. The words are actually the packaging the flowers were in, it was clear with white writing and you couldn't see it very well so I glued black paper to the back.
 I cut out the bike that is on the papers and then glued it to black paper and then cut it out again to frame it. Just for a little depth. I also used some bling from Zva!!!
Thanks so much for stopping by!! I do truly appreciate it!

Monday, April 15, 2013

The Paper Mixing Bowl Reveal!!!! April

Hello and welcome to The Paper Mixing Bowls April Reveal!!! This recipe was just so beautiful to work with. Here is the recipe:
SO here is the recipe I cooked up.
A photo of my beautiful grand daughter. We were out in our backyard and ya know those fairy fuzzy flowers that when you blow on them they fly all over.....well she picked a flower that kinda looked like it and I told her to blow on it and it just wouldn't do anything and then she figured it out and that is why she has that look on her face!!!
Some hand made flowers because most of the time I can't find flowers that match!!!! I have a couple of tubs and still can't find matches!!
The butterfly spray, a close up of the molding paste I used also.
This recipe was a lot of fun to cook. I hope you join us.... Thanks bunches for visiting!!!! Have a wonderful week!!

Tuesday, March 26, 2013

PaperHaus DT Project. Memory Box!

Welcome friends!!. I hope you are all having a great start to the week. Here is a DT project for PaperHaus Magazine . If you have not yet been over to this magazine please visit. SO many talented people in it.
I had a request from my daughter that she would like a container to keep her photos in so I decided to make a memory box. She "found" this box for me to cover for her. I kept it really simple for she would be grabbing it and opening it a lot so only decorated the top and 1 side.
I used papers from the Firefly collection from Prima. I just love these papers!!!! This is the top and I made the flowers, rolled the paper back, dyed the lace to match, and added some bling and ribbon and one of those awesome Prima Junkyard Findings.
 This is the side and I made her a pocket to keep the tags I made for her in it. Little somethings to write down her memories!
 These are the tags I made for her and the heart I made and painted with some acrylic silk paints. They have such a shimmer.....love them!! That is my project for the day. I hope you enjoyed it.

Thanks for visiting and have a great week!!!!

Friday, March 15, 2013

The Paper Mixing Bowl reveal

Hello and welcome. This months recipe at The Paper Mixing Bowl is just so fun!!! Come on over and join us for a little corned beef and cabbage! Here is the recipe:
Here is what I cooked up.
What can I say I am not Irish. This is my take on the sketch and recipe. The recipe called for "wee" things so I made this layout an 8x8. Yep I did. For the Irish lace I used an iridescent medium and a mask. I stamped on my background, used mostly green and a key for me lucky charm!!! Well I hope you enjoyed this and hope to see you play along with us.


Saturday, March 9, 2013

PaperHaus DT tutorial!!!

Hello, I am sharing a simple tag tutorial for you today. You can use any tag die or even hand cut one. I also used a flower die and again any flower die will do also, I did hand cut the leaves in different sizes. I used the Sizzix-frame back, ornate #3. I love this die!!!!
So punch out your die and flower shapes. I used the Kaiserkraft "Pink Gelato" collection for the tag shape and white card stock for the flowers and leaves. These are the color stains I wanted to use.
 Then spray your flowers and leaves so the stain blends better and always start with the lightest color first.
 Here you can see I used the Spun Sugar first.
 Hen I added The Lemonade stain and after that I added the Broken China. I used Peeled Paint for the leaves. Then while the flowers are damp I like to scrunch them up and shape the leaves some. Let them dry either by themselves or a heat gun.
 Then after they are dry I like to unravel them and if they need it shape the petals a little. I also like to draw  the veins on the  leaves.
 So when you are assembling the flowers always off set the petals. This makes the flower look more realistic. I used a small sun punch for the center and the added a pearl to the center of that. Then glue on the tag and you are done. If you use light paper you can journal over the top or you can add this to a card!!!
 Here is the finished tag. So many possibilities!!! Have a great weekend and thank you for visiting!!!


Friday, March 8, 2013

Winner announced!!!!! PaperHaus Magazine Blog Hop!!!!

Hello!!! I have a winner!!! I used random.org and the lucky number is 22 who is SuziQinTx and here is her comment... "so much fun looking at all the beautiful projects, thank you!" Please contact me and I will get the prize to you!!! Congrats!!!!!!!!!

Friday, March 1, 2013

PaperHaus Spring Fling Blog Hop!!!!

Hello and Welcome to the PaperHaus Spring Fling Blog Hop! We are excited that you joined us in celebrating the release of the Spring Issue of PaperHaus Magazine! We are excited to share all of the amazing projects and inspiration in it with you! Please visit PaperHaus Magazine Please take some time to Like us on Facebook (https://www.facebook.com/thepaperhaus


I am offering a small RAK of scrappy goodies. Now in order to win the RAK from me you must become a follower and leave a comment about the hop. I will use random.org to pick the winner. Hope you enjoyed this blog hop!!!!


PaperHaus Blog - www.thepaperhaus.com
Frank Garcia - www.hausofw.com
Ivana Camdzic - http://papergirlcrafts.blogspot.com
Trina McClune - trinamcclune.typepad.com
Jodie Lee- www.jodieleedesigns.blogspot.com
Lisa Gregory - http://what-a-beautiful-mess.blogspot.com
Stacey Young - www.staceyeyoung.blogspot.com
Maiko Kosugi - www.maimaipiano.blogspot.com
Fun Stampers Journey
http://www.myfunstampersjourney.com/category/blog
The Piece by Piece- www.thepiecebypiece.blogspot.com
Corri Garza - http://www.buglvr.blogspot.com
DeeDee Catron - http://umwowstudio.blogspot.com
Audrey Yeager- http://audreysreflection.blogspot.com
Sabrina Alery - http://www.sabrinaalery.blogspot.com
Patricia Roebuck - www.roebuck-adventures.blogspot.com
Jess Mutty - www.scrapgoo.blogspot.com
Anna Sigga - http://annasigga.typepad.com/scrappalicious
Susan Tutt - http://susanscrapbooker.blogspot.com
Rommel Okuma - http://risqueerabisque.wordpress.com
Bente Fagerberg http://paperandglueheaven.blogspot.com
Izzy Anderson - http://writesnapscrap.blogspot.com
Jennifer Grace - http://jennifersjumbles.blogspot.com
Christina Heeren - http://christinaheeren.blogspot.com
Gina Rodgers - http://gingerbread.typepad.com
Lori Hairston - http://www.lorihairston.blogspot.com
Paper Issues- http://www.paperissues.com
Peg Hewitt - http://pegsplaytime.blogspot.com.au
Georgia Heald - http://startingtoscrap.blogspot.com.au
Leah Crowe - www.leahscraftylife.com
Jodi Baune - http://www.dancingintherainjb.blogspot.com
Heather Leopard - http://thespottedleopard.blogspot.com
Diana Fisher - http://designbydiana.blogspot.com
Kate Vickers - www.scrapsation.com
Sarah Andreotti- www.vintagepearstudio.com
Leah Farquharson - http://www.bluebirdchic.com/blog
Cathi O'Neill - http://celticknotted.blogspot.com
Missy Gener - http://www.missygener.com
Marilyn Rivera - http://marilynrivera.blogspot.com
Julianne McKenna - http://julestheblingprincess.blogspot.com
Vivan Keh - http://contadinak.wordpress.com/
Jelissa Mei - http://jelibeanz.blogspot.sg/
Sara Zenger - www.sarazenger.blogspot.com
Emilia van den Heuvel - http://few-favourite-things.blogspot.com
Linda Brun - http://favoritspotonearth.blogspot.no
Lisa Duke - http://theshabbyhorse.blogspot.com/ -------->Now make sure you go TO PAPERHAUS FACEBOOK www.facebook.com/thepaperhaus

Friday, February 15, 2013

The Paper Mixing Bowl Reveal--Australia

Hello there...here is the February reveal for The Paper Mixing Bowl . This was a great recipe and sketch to follow. Come on over and play along with us.
Here is the recipe and sketch
And here is my take on it. I absolutely LOVED my trip to Australia last year where I met up with a sb.com friend Faye and I had a trip of a life time!!! She is one of the most kindest people I have ever met and I am lucky to have her and her family in my life!!!
Here is a close up. I just got a new, well new to me sewing machine so I am giving it a go. I always have loved how the sewing looks on layouts and cards. It is harder than it look to keep things in line!!!
Thank you so much for stopping by!! I appreciate it. SO come on over and have a play with this awesome recipe and sketch!!


Saturday, February 9, 2013

A Simple Tutorial-- Resist Technique--PaperHaus Magazine DT


Hello!!! Hope you all have a good crafty week. This is a tutorial for my DT at PaperHaus Magazine . There is so much inspiration at PaperHaus Magazine!!!
I am here to share with you a simple tutorial that you can get so many results with. This is my version on a resist technique.
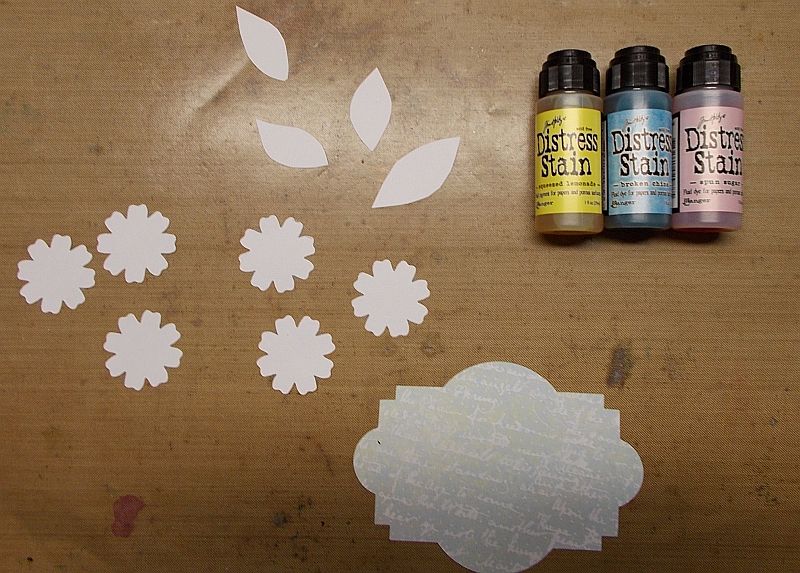
Here are the supplies you will need:
Inks of you choice.
Stamp of choice
Embossing ink, clear or white
Heat gun,
Blending tool and of coarse a tag.
 First use the embossing ink pad on your stamp.
 Then stamp on your tag where you prefer. I always try and get 2 sides of the tag stamped. One using a good portion of the stamp and the next one maybe use half or a quarter of the stamp.
 Then cover stamped area with the embossing powder, shake excess off.
 Then Using the heat tool set the powder. It should look like this when you are done.
 Then decide which colors of ink you would like to use and use your blending tool. The neat thing about this is you can customize your colors to match your project also. Use the tag for a layer or use this technique to create your own layers. The possibilities!!!! Here is what I came up with.
 Thank you so much for stopping by. I hope you have enjoyed this!!! Have a wonderful weekend!!!

Wednesday, January 23, 2013

Tag Time fpr PaperHaus magazine

Hello everyone! Hope the start to the year has been great for all. Lisa here with a tag I made for my DT at PaperHaus Magazine. I have to say that when I start them I never know where I am going to end up.


First I started with some Maja design papers Which you can find in my store, The Shabby Horse Cafe and cut out the base of the tag. Then I start cutting smaller pieces for layers. Once I have the layers I am happy with I distress, ink and mist each individual layer. After that I arrange them where I like and glue them down slightly. Then if it looks kinda empty I will find a mask I like and gesso a pattern on it.

Then start looking at my stash and decide what I should use. In this case I used Prima and Petaloo flowers, some leaves I made, some chipboard clock hands, hand dyed seam binding and the beaded thingy is one of those wine glass markers I found at a thrift store.


I cut out a title I liked and wala I was done!! I hope you enjoyed this and thank you for visiting!!!

Tuesday, January 15, 2013

The Paper Mixing Bowl--Jan. Reveal "Yesterday"

Hello and welcome. This is my DT take one the colors and sketch for this months recipe at  The Paper Mixing Bowl  I also used a metal charm from Handmade Halo. Here is the recipe for this months challenge. I LOVE these colors and the sketch and it was fun to work with!!

You ever have those pictures where you remember exactly where, when and why it was taken?? This is one of those for me!! One of my favorite picture of my son and I. This was taken by a river we liked to explore and was taken about 23 years ago. I remember the details to the "T" and of coarse it seems like it was yesterday!!!
I started out with some blue paper and didn't like the color so between some paint, ink and distress stain I got it to where I was happy with the color. I did manage to get most of the recipe on there. I have hidden journaling on the tag under the picture, a message to my son!!
Thank you so much for stopping by. I truly appreciate it. I hope you are having a wonderful start to the new year!!!

New "Grab Bags" in the store..

Hi there, Hope everyone is having a fantastic day...Here in California we have not really had a winter yet...waiting on some most needed ra...