
Supplies needed

2 large butterflies
2 med. butterflies
Strong glue
Antenna wire
Gesso
Acrylic paint of choice
Scissors
Lace
Stickles
Gems for body

First lightly distress edges of butterflies and then lightly ink the edges.

Fold up the butterflies. I like to make the creases go the same way as the vein would. I fold the butterfly in half first (so wing to wing are together) then angle the folds,

so they come out looking like this.

Now using a thin strip of glue down the body line, adhere the medium butterfly to the large one taking care as to not spreading the glue under the wings. I use my fingernail, or tooth pick and run it down the body line. Let the glue set.

Get some gesso and paint and dab the paint into the gesso to lighten it up a bit and then dab on the butterfly wings. I also dabbed on the smaller wings a little. I could of done this step before I glued them together but I didn't so hey this works to!! Set aside to dry for a bit.

To make the antennas, you can use various items for instance the stem off one of your paper flowers. In this case I used white floral wire. Cut about 4 inches, fold in half and turn down the ends. You can use anything for this. I used my needle nosed pliers. I like them to look different and not all the same to give the butterfly some personality. (did I just type that!!)

For the lace I use ruffled lace. It makes the wings pop up a bit. Cut a 2 inch length and cut to shape the wings. This does not have to be perfect as you can see! Do not cut the seam off, cut away from the seam.

Use a strong glue for this next step. Hold the smaller wing up and put up and put a line of glue right next to the body line and place your winged shaped lace on top of the glue.

Try not to push the lace towards the body and squish the glue towards there, you don't want the wing to stick to it. Same procedure on the other side.

To attach antenna cut a scrap piece of paper keeping it small enough to "hide" behind the butterfly and put a blob of strong glue on it. Place the antenna on top of the glue.

Then place the butterfly on top of that squeezing the glue around to get a good hold. Let set for a minute or two.
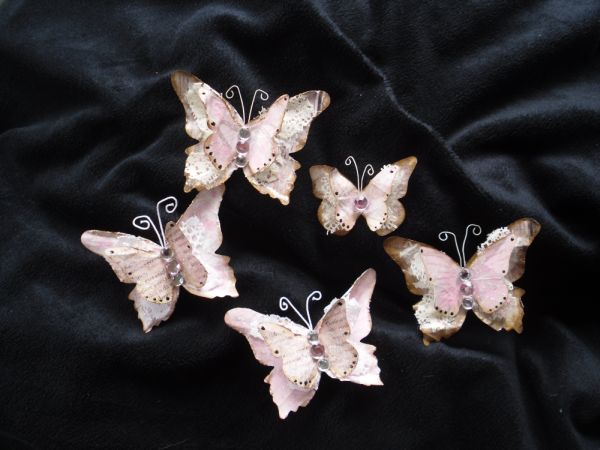
The adhere the gems to make the body, or whatever you choose to use for that. Then I add glitter and walla you have a butterfly. You can do this in all kinds of sizes.

Hope you like this tutorial. This is my second one so I am still very new to this. Have fun!!!!
Hope you like this tutorial. This is my second one so I am still very new to this. Have fun!!!!


Thanks for the tute, Lisa! Beautiful butterflies! Thanks for sharing!
ReplyDeleteGreat tut lisa! Love the butterflies! Beautiful blog you have. Hugs girl!
ReplyDeleteGreat Tutorial Lisa. Your butterflies are GORGEOUS and I will definitely be giving this a try! TFS!
ReplyDeleteoutstanding and creative
ReplyDeleteBeautiful butterflies...and thank you for the wonderful tutorial!
ReplyDeleteLisa, thanks for sharing this tutorial! Very pretty little bugs! Jan Shore (Tysgma)
ReplyDeleteGreat tutorial Lisa, I'm gonna have to give them a try for my artwork. Love your blog backgroung too, definitely have to start following!
ReplyDeleteHave a Great Day!!
Norma G.
http://theshabbyhorse.blogspot.com/
These are SO beautiful Lisa! Thanks for sharing! I can't wait to try them!
ReplyDeleteLove, love these. I made a bunch of pink ones for my daughters birthday invitations, I loved them so much I made some for her bedroom door, then some more for party decorations.... They are just gorgeous. Thanks so much for sharing.
ReplyDelete